Showing posts with label Vinegar. Show all posts

Wednesday, October 12, 2011

Red Velvet Cup Cakes


I had made these when mom dad were around but they weren't perfect especially they were little on drier side. So this time I made little bit change in quantities and they come out perfect. I frosted them with White Chocolate Cream Cheese Frosting.

Red Velvet Cup Cakes
Ingredients
2.5 Cup Maida
1/4 Spoon Coca Powder
1/4 Spoon Baking Soda
1/4 Spoon Salt
1.5 Cup Sugar
1 Egg
1.5 Cup Oil
2 Spoon Curd
1 Spoon Liquid Red Food Color
1/4 Spoon Vinegar
1/4 Spoon Vanilla Essence

Method
  • Preheat oven to 350F/175C
  • Sieve Maida and Coca Powder in a bowl
  • Mix in baking soda, salt and sugar in it
  • In separate bowl add in egg, oil, red food color, vanilla essence and vinegar.
  • In a cup add in the curd and fill it with water. Mix well with the fork and add it to the wet mixture (oil-egg mixture)
  • Beat the mixture on low speed till smooth
  • Add in sieved dry mixture of maida-coca powder a cup at a time and beat slowly till it accommodates in the mixture.
  • Line the cupcake pan with the paper cups. Divide the mixture in 12 cups.
  • Bake the cake on 350F/175C for 22 minutes

Notes
I normally turn around the cupcakes after 70% of baking time in this case around 15 minutes. It helps in even baking of the cakes.

Read More »

Tuesday, August 16, 2011

Veg Manchurian


I like Indian style Chinese a lot and I make it very regularly. But after loosing Kitchen to Mom :), it was while since we had Chinese. So on Friday, I decided to take the kitchen in control and make Chinese menu for dinner. I have made Veg Machurian so many times but every time I had trouble with photo, so this time since the photo also came out okayish, here is the recipe.

Veg Manchurian
Ingredients
2 Cup Cabbage
2 Cup Carrots
2 Cup Beans
1 Bell Pepper
1 Green Chilli
3 Spoon Corn Flour
5 Spoon Maida
1 Spoon Garlic Paste
2 Garlic Cloves
3 Stems of Spring Onions
1/4 Cup Sweet Chilli Sauce
1/4 Cup Soy Sauce
2 Spoon Hot Chilli Sauce
Salt to taste
Oil

Method
  • Chop cabbage, carrots, green chillies, beans and pepper into fine pieces.

  • Add in salt to taste and mix well.

  • Add in garlic paste, 4 spoon of Maida and 2 spoon of corn flour. Knead well to make the dough

  • Make small balls from this dough and roll each of them into the remaining Maida and fry in the medium hot oil till golden in color. Keep aside.

  • Heat oil in pan and add in finely chopped garlic cloves, spring onion's white part and fry till light brown in color.

  • Add in sweet chilli sauce, hot chilli sauce, soy sauce and mix well.

  • Take 3 cups of water and mix in 1 spoon of corn starch. Add it to the sauce that is boiling in the pan. Mix well

  • Add in the Manchurian balls made earlier and cook for couple of minutes. Garnish with spring onion's green part and serve.

Notes
Normally I add in salt and keep aside the mixture of finely chopped vegetables aside so that i don't need to add extra water nor do the dough loosens after a while because of all the water that salt would come from the vegetables.
Instead of using sweet chilli and and hot chilli sauces, I have also used 3 spoon chilli flakes, 1/4 Cup Vinegar and 2 spoon sugar instead.

Read More »

Tuesday, October 26, 2010

Ras Malai


Ajoy wanted me to make this for Dasara but ended up getting the raw material (aka milk) quite late on sunday. So I made it yesterday. It has turned fabulous and the sweetness is perfect not too sweet not too bland..

Ras Malai
Ingredients
2 Liter Milk
2 Spoon Vinegar
1 Pinch of Saffron
1/4 Spoon Cardamom Powder
1/4 Cup Almonds
1/4 Cup Pistachios
3 Cup Sugar

Method
  • Boil 1 liter of milk in a pan.
  • Mix vinegar in half cup water and add it gradually to the boiling milk.
  • When the whey separates from milk fat strain it on cheese or muslin cloth. Run through cold water and let it hang for an hour or two so that water is drained completely out from the paneer
  • Start boiling remaining 1 liter of milk in a wide pan, stir continuously and let it reduce to half.
  • Add in safron and 1/2 cup sugar in it and let it simmer for another couple of minutes. Keep aside.
  • Mix in remaining 2.5 cup of sugar with 1.5 liter of water in a cooker or wider pan. Bring it to boil
  • Mean while knead the paneer really well till its smooth. Make small flat discs and drop them in the boiling sugar water. Cover with the lid (if in cooker don't put the whistle on) and let it cook for 10 minutes on high.
  • Let it sit covered for another 5 minutes and then uncover the pan and keep the discs in syrup and let it come to warm temperature. At this point the discs would have doubled in size.
  • Take each disc in your palm and press lightly to remove the syrup from it, then drop these discs in a bowl.
  • In earlier prepared milk add in cardamom powder and finely chopped almonds and pistachios. Pour this milk over the discs in the bowl. Chill and serve.
Notes
I soak the almonds in water for couple of hours so that you can very easily chop them.
You can also use half liter of half and half instead of using 1 liter milk to make ras of the ras malai. Just let it simmer and add in saffron.
I didnt have big vessel to accomodate all the discs in one go for cooking, so i cooked the half of discs as mentioned, then added 2 cups of water to the syrup and cooked rest of the discs. Keeping sugar syrup thin is key to make those discs soft. Dont overcrowd the disc so that they have space to double in size
Read More »

Tuesday, September 14, 2010

Sandwich


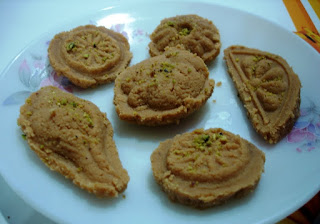
This is my favorite bengali sweet. So when I was making Ajoy's favorite mishti dohi i decided to pamper myself with these. Turned out very delicious.

Sandwich
Ingredients
2 liter Milk
4 Spoon Vinegar
1 Spoon Rawa
2 Cups Khoya
1/2 Cup Powdered Sugar
2.5 Cup Sugar
Silver leaf
Pistachio Powder
A pinch of Baking Powder
Couple Pinch of Saffron

Method
  • Keep 1/4 cup milk aside and bring remaining milk to boil and add in vinegar mixed with two spoon of water.
  • Stir till the whey separates out and milk cuddles.
  • Strain it through sieve and run through cold water. Let it sit there for 5 minutes so that water drains out completely.
  • Mix sugar with 6 cups of water in a cooker and bring it to boil.
  • Take out this paneer from the sieve and knead till very soft dough forms.
  • Add in rawa and baking powder and knead again.
  • Make thin flat squares and add half of them into the sugar syrup boiling in cooker
  • Close the cooker lid and let out one whistle. Lower the heat and let it cook for another 10 minutes. Let it cool
  • Takeout the cooked paneer and add another 2 cups of water in the cooker. Bring it to boil and add remaining paneer pieces to cook just like the earlier ones.
  • When the second batch is cooled down store all paneer pieces with the syrup in the fridge overnight
  • In the morning grate the khoya and add in powdered sugar in it.
  • Warm the remaining 1/4 cup of milk and add in the Saffron in it. Add it to the khoya and knead till smooth.
  • Take out the cooked paneer pieces from the fridge and cut each into triangle shape
  • Make sandwiches by adding a layer of khoya paste we made between two triangles. Also sprinkle some pistachio powder on the khoya layer as well as on top of the sandwich
  • Garnish with the silver leaf and serve chilled.
Notes
Instead of making thick pieces and cutting it through i made thin slices to begin with. So i could use single piece as it is.
Read More »

Wednesday, February 10, 2010

Paneerbhara Kabab


Today when I opened fridge, found that I have around 2 liters of milk and it is getting expired tomorrow. Gave a lot of thought on what I should be using it before I loose it. Last few times I had been making sweets but this time I wanted to make something spicy and that is when I came up this.

Paneerbhara Kabab
Ingredients
2 Liter Milk
5 Spoon Vinegar
1 Cup Corriander Leaves
2 Spoon Pudina Leaves
5-6 Green Chillies
2 Bread Slices
1/2 Spoon Chaat Masala
Salt
Oil

Method
  • Boil Milk in a thick pan
  • Mix a cup of water with vinegar and add it to the milk to separate whey from it.
  • Strain it and wash it with cold water.
  • Hang it in a dry cloth for around half an hour to remove as much as water as possible
  • Preheat oven to 350F/180C
  • Bake bread slices for 5 minutes at 350F/180C, Flip the sides and bake for another 5 minutes
  • In a mixie, grind the bread to breadcrums. Save aside
  • Grind corriander leaves, pudina leaves and green chillies to fine paste without using water.
  • In a plate mix the paneer that was hanging, the above green paste and salt
  • Make small lemon sized balls and roll them in bread crums
  • Heat oil and fry the balls in it over medium-high heat.
  • Sprinkle chaat masala and serve with ketchup

Notes
If you want you can make it with grated paneer instead, but it tasted awesome with this fresh made paneer and the softness inside the crispy covering was delicious.
For the corriander-pudina-green chillies paste I didnt use any water. The water that was on leaves after washing them was good enough.

Read More »

Wednesday, January 20, 2010

Gurer Sandesh


On the eve of upcoming Saraswati puja I decided to give this a try especially with gur because Ajoy loves that version.. It came out really well and the best part was it was not the tedious process unlike Kalakand which he keeps demanding. So now if he asks for sweet and I am tired I have something quick yet brownie point winner for my help :)

Gurer Sandesh
Ingredients
1 Liter Milk
3/4 Cup Jaggery
2 Spoon Vinegar
1/4 Spoon Pistachio Powder

Method
  • In a thick pan boil the milk
  • Mix vinegar with 2 spoon of water and add it slowly to the boiling milk
  • When the milk cudles completely, take it off the heat and strain it out
  • Wash it under running cold water
  • Put it in the muslin cloth and drain the water. Keep it aside for 5 minutes so that it drains out water completely
  • In a plate knead the chena formed till its is soft and consistent in the texture.
  • Mix in grated jaggery and transfer it to the thick pan
  • Cook the mixture over medium heat till it leaves the sides and is able to hold together.
  • Make the small balls and press them against the chenar moulds, and if you dont have them just shape them into balls
  • Sprinkle the pistachio powder for garnishing

Notes
I used the Patali Gur since I had got it from Kolkatta when I had been there last month. But you can also try it with the normal Jaggery. I also feel that Patali Gur is more of the Date + Jaggery taste. So if I try with jaggery version I am going to try adding paste of Date or something like that. Will update when I try that though.
While separating whey from the milk make sure to remove it off it immediately when you see the clear green water separated from the chena. Extra cooking can make the mixture stiff.
Key to shaping the sandesh is that you shape them while its hot. As it starts cooling down it becomes difficult to shape them up. I warmed the mixture after it came to room temperature so that I can shape the remaining ones.

Read More »

Thursday, October 29, 2009

Kalakand


Today morning when I was just thinking about making some sweet, suddenly thought of Kalakand I had when Mehul had taken us to temple for his new car's puja. I searched a little bit for the recipe and found that its very easy one. Oh but when I actually made it, I knew though the recipe is simple, it does take a long time to get to the final product. Especially boiling the milk to half and then drying it completely.

Kalakand
Ingredients
2 Liter Milk
1 Cup Sugar
3 Spoon Vinegar
1 Spoon Pistachio
A drop of Kewada Essence
A Silver Leaf

Method
  • Boil half of the milk.
  • Mix Vinegar with 3 spoon water and add it to the boiling milk.
  • When the whey separates completely remove it from the stove and strain it
  • Wash it through running cold water
  • Put it in the muslin cloth and drain the water. Keep it aside under the heavy pan
  • Boil remaining milk till half in quantity
  • Add in the curdled milk stored aside in it and cook over medium flame till the mixture thickens
  • Add in sugar and kewada essence. Cook till the mixture thickens completely.
  • Spread the mixture on the plate, apply the silver leaf and garnish with chopped pistachios
  • Let the mixture cool. Cut it into cubes and serve

Notes
I tried using non stick pan to boil the milk to half but it didn't work well. So I transferred it to the aluminum pan. It works best for making the sweet.
While boiling down the milk, you need to stir it constantly and vigourously so that it doesnt stick to bottom or sides of the pan.
05Nov: I tried using 2 galons of milk instead of 2 litre today which is approximately 8 liter and I had terrible time boiling down the milk to half and even after adding paneer. I totally missed the fact that since its boiling of the milk the time taken would be increasing and wont be a marginal increase. So be aware if you are making it in bulk. Its too much of work. And it made approximately 16 pieces of sweets with 2 liter and we finished it so fast that I had to make it again :) and thats how I thought of making it in bulk so that we can give it to few others too :)

Read More »

Friday, April 10, 2009

Raskadam


Its been quite a few months since I had Raskadam one of my favourite sweet. So thought of giving this a shot. The recipe was adapted from 'Ruchira' a well known recipe book in Pune.

Raskadam
Ingredients
3.5 Cup Milk
1 Spoon Vinegar
1.5 Cup Sugar
1.5 Cup Powdered Sugar
4 Cup Khoya
A pinch of Saffron
1 Cup Grated Paneer

Method
  • Warm couple spoon of milk and add the safron. Keep aside.
  • Heat the remaining milk
  • When the milk starts to boil add vinegar mixed with a spoon of water and stir continuously.
  • When the milk cudles and water is separated out, throw out excess water and run it through the cold water
  • Squeeze this mixture in a cotton cloth and drain out the water.
  • Mix it thourghly and make the dough out of it.
  • Prepare around 25 balls out it (small sized
  • Mix the sugar with the 6 cup water in the cooker and boil it
  • Add these small balls in it and let it boil for around 5 minutes
  • Cover the cooker with lid and boil for another 5 minutes
  • Remove the lid, add half cup of water and boil for another 5 min. Let the balls cool down. Take out these balls and spread them on the plate and keep aside
  • In a nonstick pan on medium flame cook the grated paneer till golden in colour and keep aside to cool down
  • Mix grated khoya, powdered sugar, safron-milk and make the dough out of it.
  • By now the paneer would be cooled and crispy. Powder it in the mixie and spread it in a separate plate.
  • Now is the time to assemble the raskadam. Cover the cooked ball with the khoya mixture by froming a cup shape around it and closing it after inserting a ball in it. Roll the ball in the powdered paneer

Notes
Be careful not to burn the paneer and stir it continuously while cooking, I did that so that it was easy to powder the paneer and the raw smell from it goes away.
The ball preparation for the raskadam is similar to the rasgulla except prepare small sized balls and quantity of sugar-water.
You can add orange or pink - red colour in the khoya mixture but i didnt have it and hence didnt use it.

Read More »

Saturday, March 14, 2009

Garden Salad


This was salad that I did impromptu with all the ingredients I had at home. The result tasted good and lettuce too this time was quite good.

Garden Salad
Ingredients
1 Cup chopped Lettuce
1/2 Cup Pineapple
1/2 Cup Mango
1 Boiled Potato
1 Tomato
1 Fresh Red Chilli
1/2 Spoon Oregano
1/4 Cup Pickled Cucumber
2 Spoon Vinegar
Salt to taste

Method
  • Add chopped lettuce to the bowl
  • Add chopped pineapple and mango in it.
  • Add finely chopped tomato in it.
  • Remove the cover from boiled potato and add the small cubes in the bowl
  • Add finely sliced red chilli in it
  • Cut the pickled cucumber into small pieces and add in it.
  • Add Salt to taste, oregano and vinegar
  • Mix well and serve.

Notes
I had cut all the stuff and added to the bowl and then around half an hour before dinner I mixed in oregano and stuff well. I thought otherwise all the flavors might get mixed in each other and wont taste as good as I would like :) and that proved right because the next day in lunch box it didn't taste as good as it was for dinner :)

Read More »